A memory leak is an incorrect transfer of resources to a computer program due to incorrect memory allocation. One of the main reasons a computer works slowly is that it does not have enough memory to slow down. Windows 10 computers depend on the memory available to perform various tasks. This occurs when a RAM’s location is not used and remains unpublished.
This usually means that there is not enough RAM installed or there is a memory leak on the Windows 10 computer. In some cases, a program may return a portion of the memory block used, in others, nothing is released.
Since physical RAM is a limited resource, it is important to make sure you have enough to handle your work stress. A memory leak cannot be confused with a space leak, which refers to a program that uses more RAM than it needs. Memory leaks are thought to occur on a Windows 10/8/7 system when the memory is not accessible even when not in use.
Going back to Windows 7, the problem of standby memory is still prevalent in Windows 10. Once your standby memory completely consumes your free memory, your system may start to lag behind, and may even crash. Because a memory leak is usually the result of a software bug or error, it is important to keep all your drivers up to date.
Before you begin, you should know that a Memory leak is a software issue to debug – for example in Java, JavaScript, C/C++, Windows, etc. Physically replacing RAM or hard disk isn’t required.
Why it’s bad?
It is clear that a memory leak is bad because it is a bug, a system error. But let’s find out how it affects the system:
- Since memory is not released even when not in use, memory is reduced as a result.
- Memory fatigue results in software aging.
- Poor available memory leads to poor response time and poor performance by the system.
- An unspecified memory leak can eventually cause an application to crash.
Memory allocation
There are different modes where applications allocate RAM. If space is not free after use, memory leaks will occur regardless of the allocated mode. Some common allocation patterns are:
- HealAlloc function for heap memory allocation. The C/C++ runtime equivalents are malloc and new.
- VirtualAlloc function for direct allocation from OS.
- Kernel32 APIs to hold kernel memory for the app. Example, CreateFile, CreateThread.
- User32 APIs and Gdi32 APIs.
Detect leaks
To solve a problem, we must first identify it. The first step in detecting a memory leak is:
- Affirmation: Determining whether a leak has occurred.
- Finding User-mode memory leak: Locating a leak caused by a user-mode driver or app.
- Finding Kernel-mode memory leak: Locating a leak caused by a kernel-mode driver component.
[thrive_text_block color=”light” headline=”Microsoft tools to diagnose memory leaks”]
- Application Verifier diagnoses heap leaks.
- UMDH ( a component of Windows Debugging Tools) diagnoses leaks for individual processes by monitoring heap memory allocations.
- Trace Capture for a thorough analysis of RAM usage.
- Xperf too tracks heap allocation patterns.
- CRT Debug Heap not only tracks heap allocations but also enables coding practices to minimize leaks.
- JavaScript Memory Leak Detector debugs memory leaks in codes.
[/thrive_text_block]
How can I fix the memory leak in Windows 10?
Just as there are different ways to prevent memory leaks, there are different ways to stop memory leaks. But before you get started, be sure to create a system recovery point first.
1] Close and restart processes
If you see that an unnecessary process is consuming too much RAM, you can end this process in the Task Manager. You need to restart the device so that the free space is available for use by other processes. The memory leak problem will not be solved without restart. A special mechanism that has bugs for slowing down the PC is runtime broker.
Try to disable it by working alone. Close and restart processes. If you see that an unnecessary process is consuming too much RAM, you can end this process in Task Manager. You need to restart the device so that the free space is available for use by other processes.
Memory leak will not be resolved without restarting. A special mechanism that has bugs for slowing down the PC is runtime broker. Try to disable it by working alone.
2] Run Inbuilt Memory Diagnostic Tools
To run the inbuilt Memory Diagnostic follow the steps mentioned below:
- First, make sure you have saved all your unsaved tasks.
- Now, press Win+R and type mdsched.exe.
- Hit Enter.
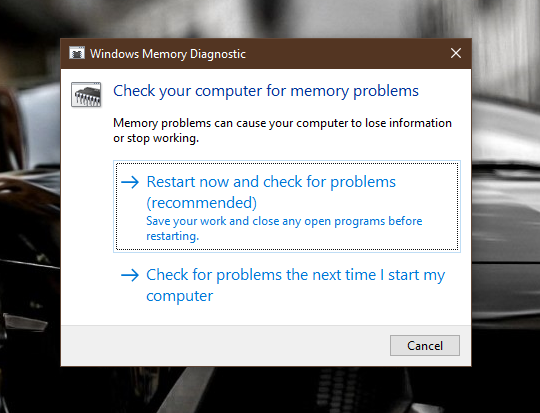
- Once the Restart is completed, you have to run the basic scan, or you can also go for “Advanced” options that include Test Mix, Cache, and Pass Count.
- Now press F10 to start the test.
Check if the issue is resolved with this temporary solution.
3] Check For Driver Updates For Memory Leak
Outdated drivers also cause many problems, including memory leaks. Windows has included the inbuilt Device Manager tool that can be used to check outdated drivers on your device.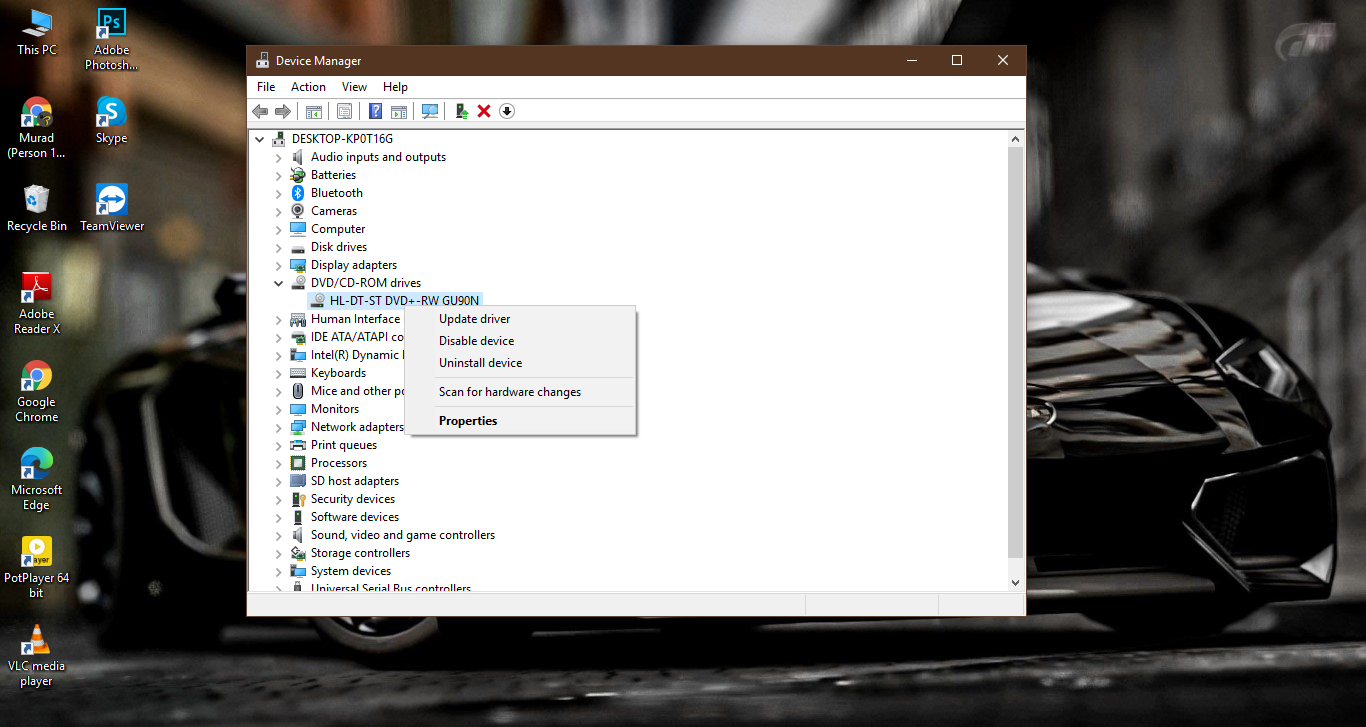
- Open a Run dialog by pressing Win + R.
- Type devmgmt.msc and press Enter to launch the device manager.
Here, check for any outdated device drivers and then update them by right-clicking on them, and selecting Update Driver from the context menu.
4] Disable Startup Programs
Some Startup programs might consume a lot of RAM on computer boot, causing the memory leak in Windows 10 and computer to respond slowly. Follow these steps to disable the Startup Programs: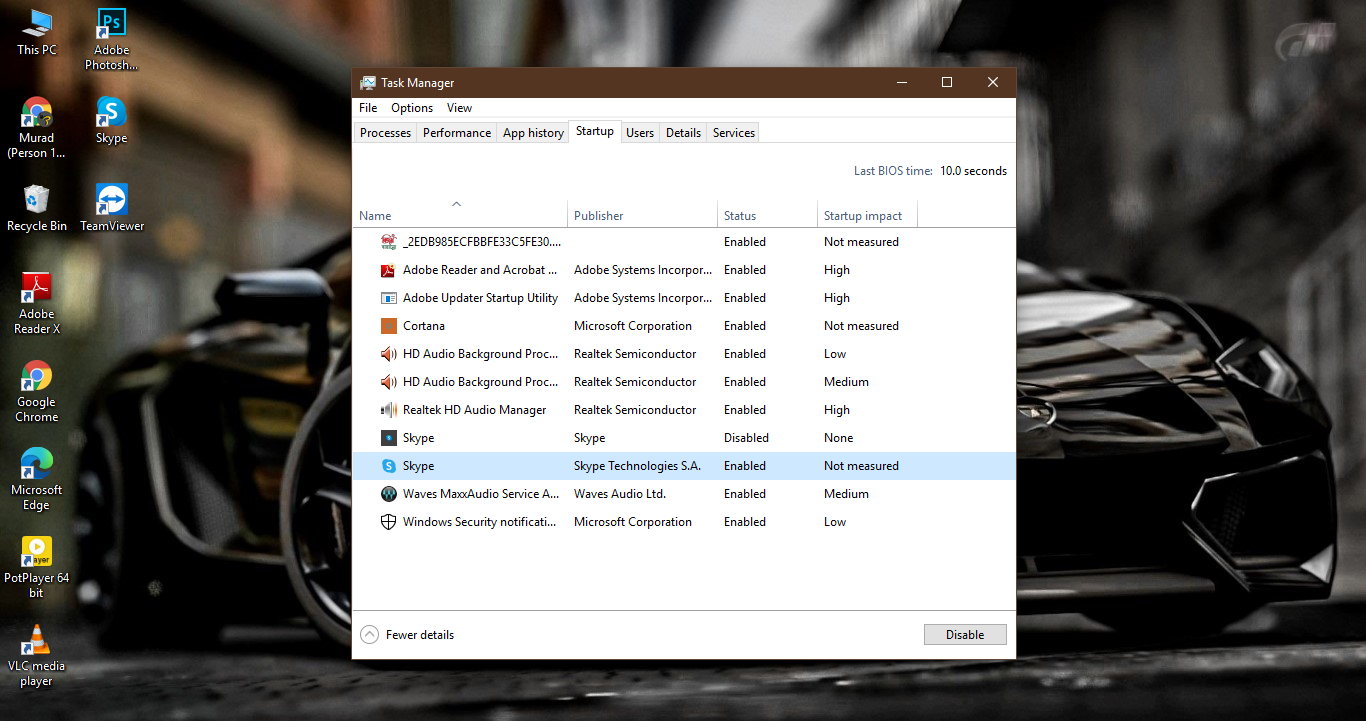
- Right-click on the taskbar and select Task Manager.
- Switch to the Startup tab.
- Select the program, which is causing the memory leak, and click on Disable.
If a program causing a memory leak is running on startup, that’s a deadly combo. You’ll just end up in a loop, where the problem automatically re-appears, no matter how many times you temporarily solve it.
To deal with this issue, we simply need to disable the troublesome program at startup, and it won’t cause us problems automatically, anymore.
If the Task Manager already showed you which program is leaking memory, and it also happens that the program runs on startup, simply disable it, and that should be it.
5] Optimize Windows For Best Performance
Adjusting for best performance will address processor scheduling, memory usage, which can mitigate memory leaks. Follow these steps:
- To optimize systems performance, you have to first go to Control Panel > System and Security > System.
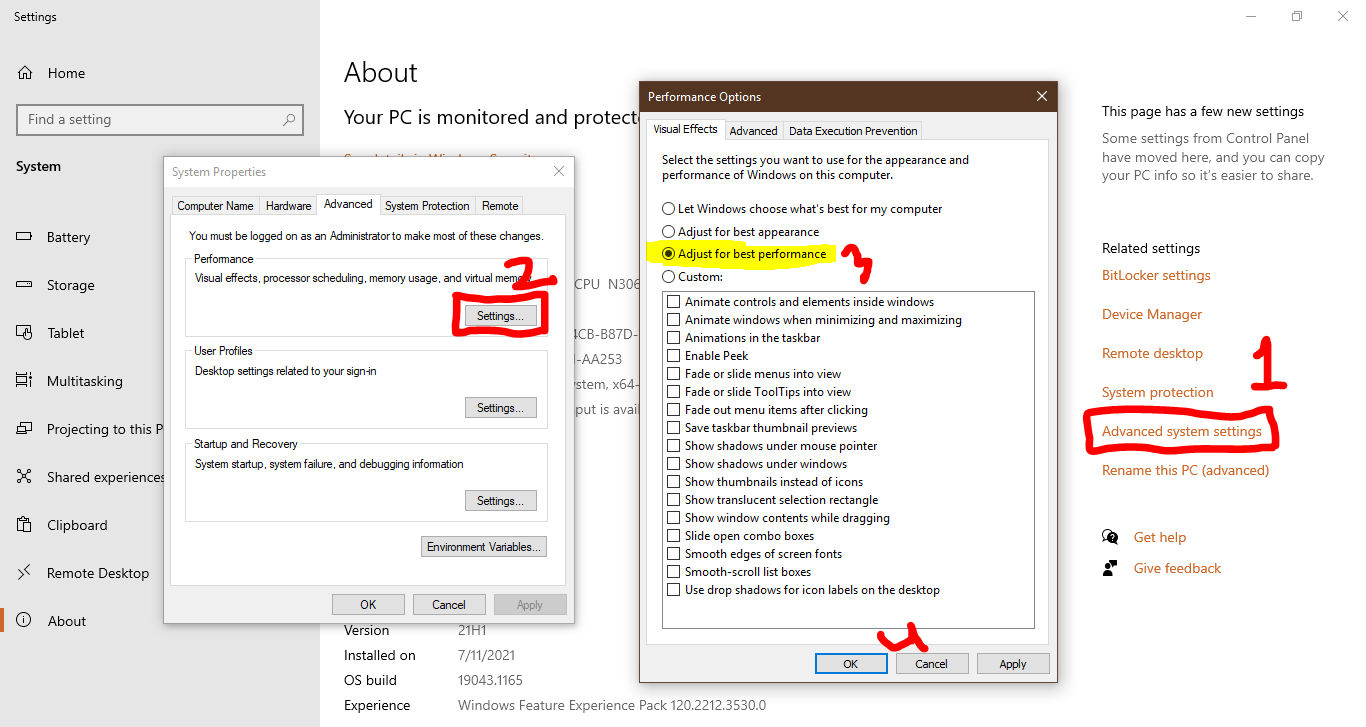
- Now on the left side of the Windows pane, move to the Advanced system settings.
- You need admin access to change these settings.
- Now under the Performance section, click on Settings.
- Under the Visual Effects tab, check for Adjust for best performance.
- Click OK to confirm the changes. Now restart the PC and see if the issue is resolved.
6] Defrag Hard Drive For Memory Leak
Windows 10 usually defrags your hard drive automatically to prevent any memory and storage errors. However, you can occasionally do this manually as well to optimize your performance.
- On your device, double click on This PC.
- Right-click on any one of the hard disk partitions. You can start with your system partition (usually C:\).
- Select Properties from the context menu.
- Under the Tools tab, click on the Optimize button, under the Optimize, and defragment the drive.
After you follow the on-screen instructions that follow, restart your device to save the new fragmentations.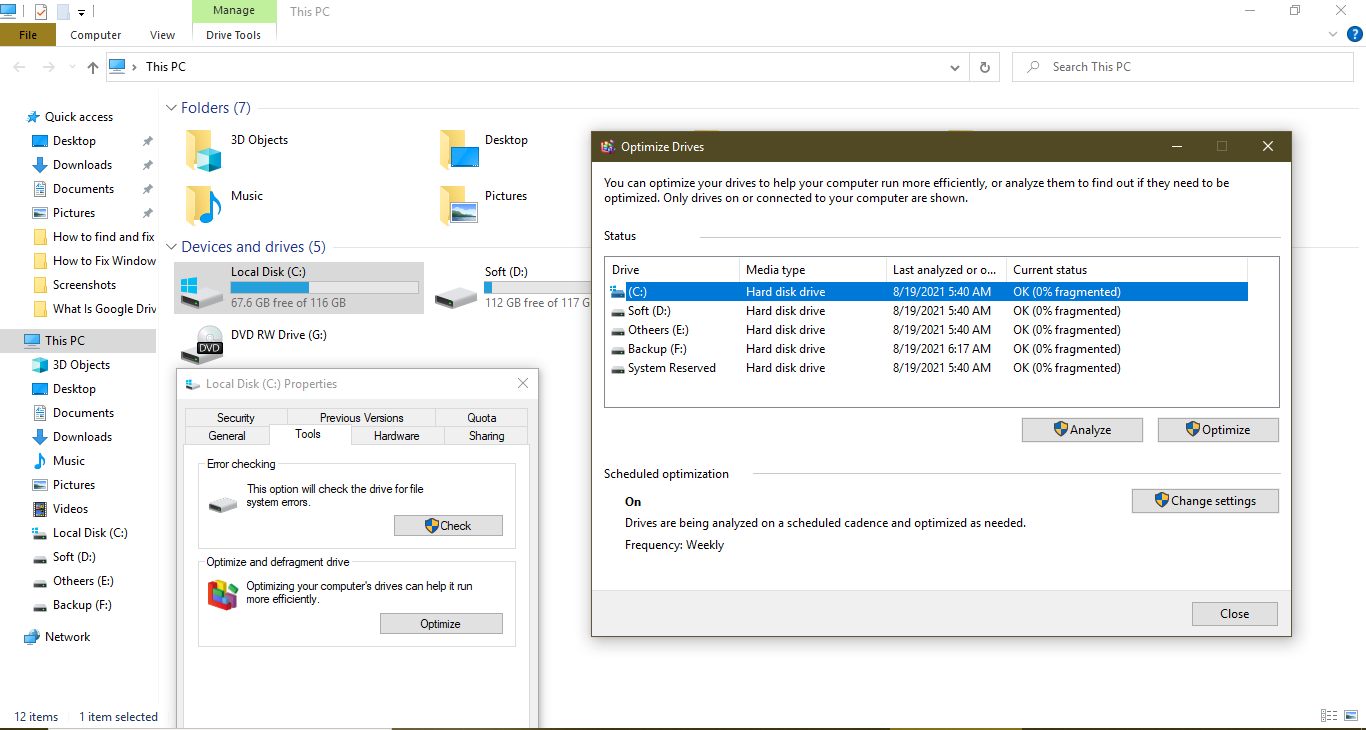
7] Disable Superfetch for Memory leak
- Go to Search, type services.msc, and open Services.
- Find the process called Superfetch.
- Right-click it, and choose Properties.
- Select Stop, and choose Disable from the Startup Type drop-down menu.
- Restart your PC.
SuperFetch is another Windows service that aims to optimize system performance. This process allows Windows to manage the amount of RAM, reduce boot time, and make application loading more efficient. Disabling SuperFetch is not recommended, but you can test it if you want to determine if it actually slows down your PC.
Compare your PC’s performance before and after deactivation. If the system is still as slow as before, you can enable SuperFetch again.
8] Remove Malware For Memory Leak
A virus or malware can increase the use of RAM. Malware designed specifically to harm your system usually puts pressure on RAM to stop your use. The solution is really simple, run a malware scan using a good antivirus program. I recommend using Avast Free Antivirus because it is light and very powerful.
Install Avast and scan a complete system. It should be able to find and delete all kinds of malware. If that fails, you can create an Avast Rescue Disk and run the scan without the Windows operating system. Since Windows is not running, it cannot hide the virus or prevent the antivirus from scanning.
Conclusion
Memory leaks in Windows 10 are usually caused by a faulty driver, especially a network driver. You should make sure all drivers are up-to-date and make sure no third-party apps are eating RAM. Since each system has a different configuration, the behavior towards any problem or its solution depends on the individual factors causing the problem.
We’ve outlined every possible solution that you hope to work on to resolve your Windows 10 memory leak problem. Give them a try and let us know what worked for you.
If you’re able to fix memory leaks in Windows 10, share in the comments how you did it.