A template is a pre-formatted document. The purpose of creating a template is to save time when certain documents are used repeatedly. If you ever want to save time, there are many benefits to creating a Microsoft OneNote calendar template. Even with intense competition from modular productivity software such as Nation, Craft, ROM Research, etc. You can create templates for any type of document such as forms, letters, envelopes, etc.
In this article, we will describe how to create a calendar in OneNote. Once you’ve created a calendar template, you can use it in your OneNote notebook to save time in the format. OneNote is an excellent note-taking tool, but Microsoft didn’t give it a built-in calendar. Microsoft One Note continues to win hearts among productivity gurus. You can find and integrate OneNote templates from the web, or better yet, you can create one from scratch.
Creating a template in OneNote lets you implement your most used fonts, page styles, colors, and more with a single click. Similar to the idea, OneNote also relies on third-party templates to get you started. It gives the pages a consistent look and lets you create different notes. You can create a monthly calendar to track projects and attach files to them. Or, create a planner for weekly activities.
However, you don’t have to rely on templates to add calendars to OneNote because you can create your own using a table. Not only are the calendars you create customizable, but you can also find important dates instantly using Windows Search. You can create a calendar template on word too easily and we provide this tutorial another article.
How to create a OneNote Calendar template
OneNote does not have a built-in calendar template. You can create your own calendar template by following the procedure described in this article. You can also set your calendar template by default. To create a calendar template in OneNote, you need to insert a table and then format it. The steps below will show you how to do this. All these steps are applicable for Microsoft OneNote 2013.
Short Tutorial for the short time
- Launch the Microsoft OneNote desktop application.
- Select the notebook to make a calendar template.
- Now, go to “Insert> Table” and select the required number of rows and columns.
- After creating a table, the next step is to fill in the date and day.
- You can format the table if you want. Here, You can bold the names of the day and set a background color for the same. To set the background color, select the row or column again and go to “Layout> Shading” and select the color of your choice.
- If your calendar is ready. To save it as a template, select the entire table and then go to “Insert> Page Templates” and save the current page as a template option. You will find it at the bottom right. Next, enter the name of your template and click Save. Your saved template can be found in the My Templates section.
More information to make a Calendar Template in OneNote
Paper notebooks, such as three-ring binders, use dividers to create sections and pockets that you can fill with loose sheets of paper. OneNote uses a similar organizational setup. Each notebook has a section and can contain many pages.
Insert a Table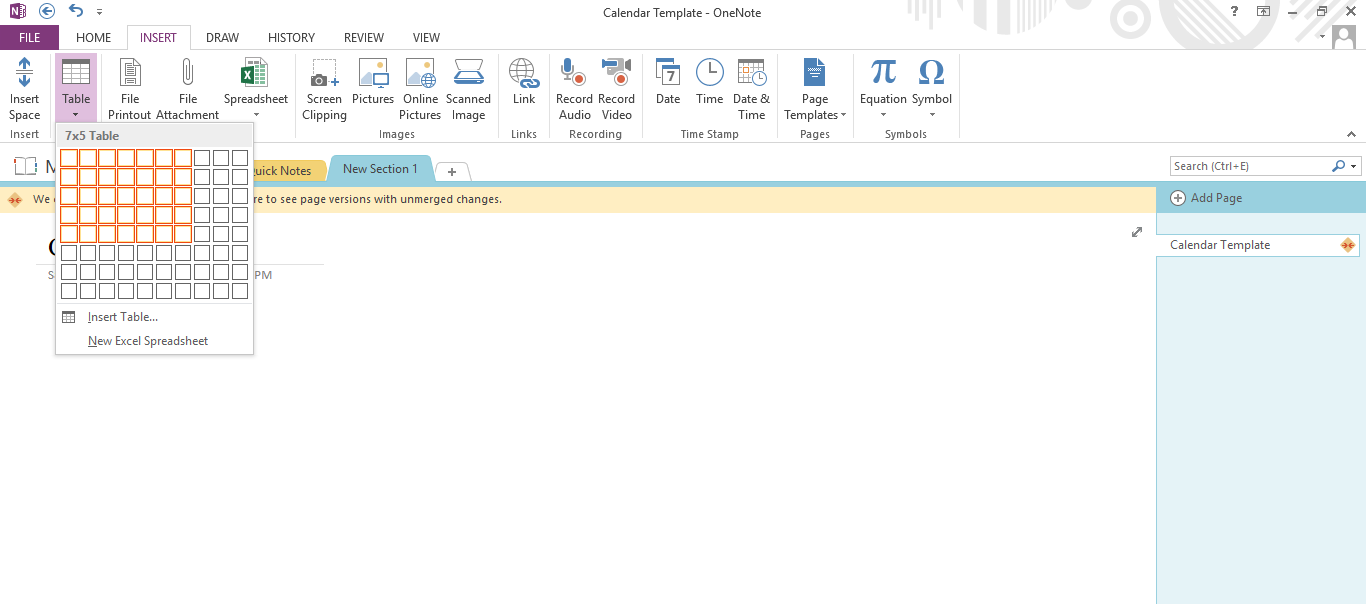
At first, we’ll create a new page. In OneNote 2016, click the + Add page button or press Ctrl + N on the keyboard.
To create a table, click the Insert tab. Click the table dropdown arrow and drag your mouse over the box so you can select rows and columns on the table. Typically, a calendar template requires 5 rows and 7 columns. But you can create a table with 7 rows and 5 columns if you want to specify the names of the day vertically. For example, Monday goes to the first column and Sunday goes to the last column. As you type, OneNote extends each cell to automatically adjust its text.
And if you watch carefully, every time you click on a table, OneNote reveals a hidden layout menu with all the table-related tools. You can add or remove rows and columns on a table. To do this, right-click on a cell, then click on the table, and then select the desired option.
If you want to change the width of a row, place your mouse cursor over the cell border in such a way that the cursor turns into a two-headed arrow. Now, press and hold the left click of your mouse and drag it to adjust the width of the row.
Fill or customize the Table
Enter a name for your calendar by clicking outside the calendar and typing the current month for the current year. For example, if you’re making a calendar for August 2021, type that to create a new note. Click the container around the note and drag it to the top of your calendar to give it a title.
You can format your calendar to emphasize important dates. You can format your calendar to your liking. Highlight a date, for example, and the radial menu will appear. When you use the radial menu, some options, such as “Bold” work immediately. For options that require menu selection, you need to click the option above, or below the arrow.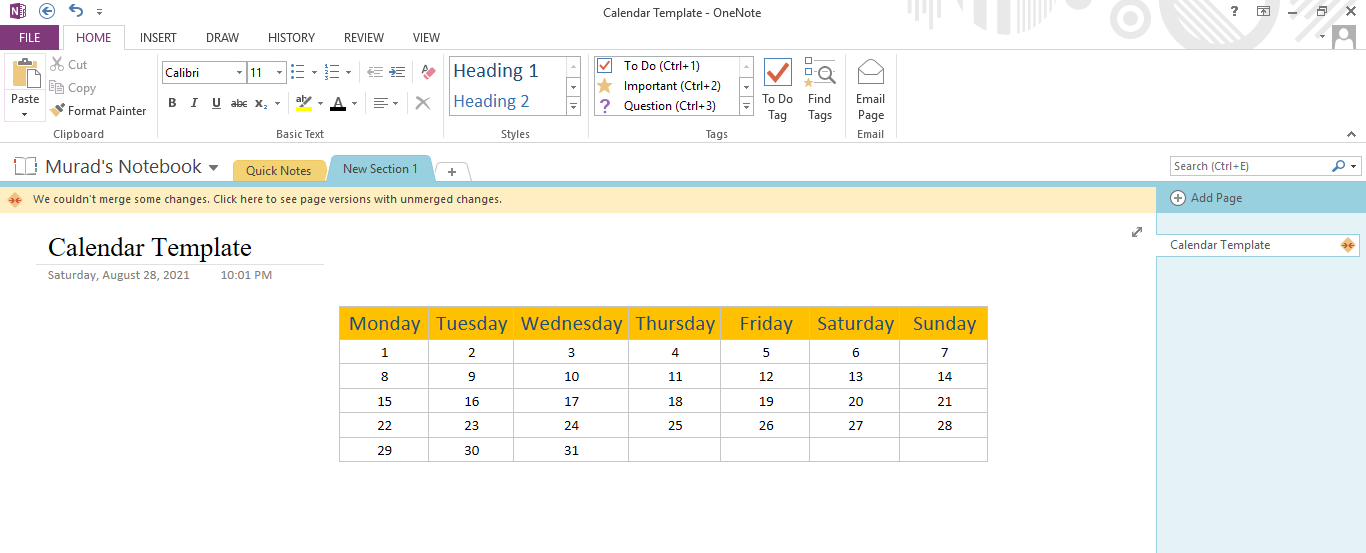
You can change the look of the text on your table and apply the layout as per your need. Let’s apply some cell shading to make it attractive. Select the cell or cells you want to format. Click the menu to view formatting options such as “Bold” and “Color.” Click the arrow above “Color” and click the color you want to apply for the highlighted color. Or, to set the background color, select the row or column again and go to “Layout> Shading” and select the color of your choice.
If you want to change the alignment of the text in the table, select it and then click Layout. Now, select the appropriate alignment option in the Alignment section.
Save your Calendar as a Custom OneNote Template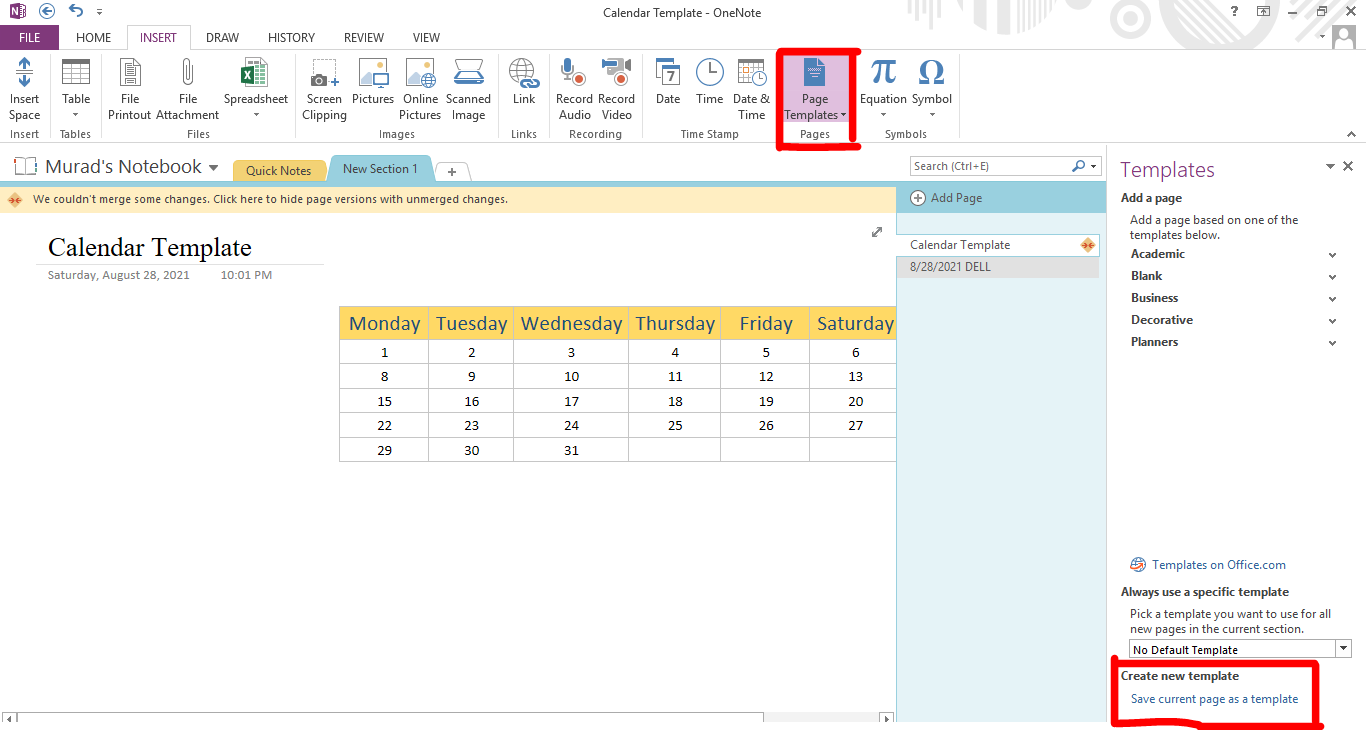
But you can improve and create your own by creating a template from the basic calendar you created. From the Insert tab, click Page Templates and select the Page Templates option. Click Save the current page as a template option. You will find it at the bottom right. Next, enter the name of your template and click Save. Your saved template can be found in the My Templates section. Type the name, and alternatively, you can set it as a default template for new pages in the current section. This will save you time if you create a new OneNote calendar each month.
Add tables to the desktop OneNote version
These table instructions apply to the Windows Store version of OneNote which works with Windows 8 and Windows 8.1. If you use an older desktop version of OneNote 2013 that has a tape, click “Insert” followed by “Table” and draw a table with your mouse that has seven columns and six rows. After you add text to the table, you can highlight any text in the menu that lets you format that text. Find the calendar item by typing in the search box.
Editing an Existing Template
If you want to make changes or edit templates downloaded from the web, OneNote lets you easily edit those templates. Go to the Insert tab and click on Page Templates. From the dropdown menu, click the Page Template option to bring the template to the task pane.
Click the small dropdown arrow next to My Templates and select the template you saved. This action opens a new blank page and applies your selected template. From here, type the name of this version of the template and save it.
How to import a template into OneNote?
You can import any template into OneNote by following the steps below:
- Launch the OneNote desktop app.
- Go to “File > Open.”
- Scroll down and click on the Browse button.
- Now, go to the location where you have downloaded the template.
- Select the template and click on the Open button.
That’s it.