This article is about how to create tables in Google Docs, choose the size of the right tables, edit it once in your document, and the best way to remove any table you don’t want. Google Docs is a free online word processor. Like Microsoft Word, it gives you the flexibility to write and edit documents. You can use tables if you want to display data, images, or objects in your document. The great thing about using a table in Google Docs is that it gives you a structured way to display items.
Working with tables in word processors is extremely important and we need it in our daily lives. This is the document and the presentation which can be a bit complicated, although both have built-in generators in the tables. It’s worth noting that Google Docs lets you easily add tables to Google Docs. Creating tables here is as easy as creating borders around a room.
To create tables, you must first determine how many columns (flowing up and down) and rows (which have been moved from left to right) you want to appear in your table. The cells are small, rectangular boxes where the rows and columns intersect. A table with a home grid furnished with tables and columns. Tables can be customized and are useful for various tasks such as presenting text data and numerical data.
How to Create/ Insert a Table in Google Docs
The first step is to open your browser and go to https://docs.google.com, where you will enter your login details (email address and password) to access your personal Google docs page. Google Sheets often have to go for structured data so Google Docs Word Processor may not be your first thought as a table maker. However, it is easy to create tables with the Docs Insert menu. A simple table can be added to Google Docs using the tables tool.
- Open the document to which you want to add the tables. If you are adding it to a presentation, open the presentation where you want to add the tables.
- Click “Insert” and hover the mouse over “Table.” A grid of squares appears.
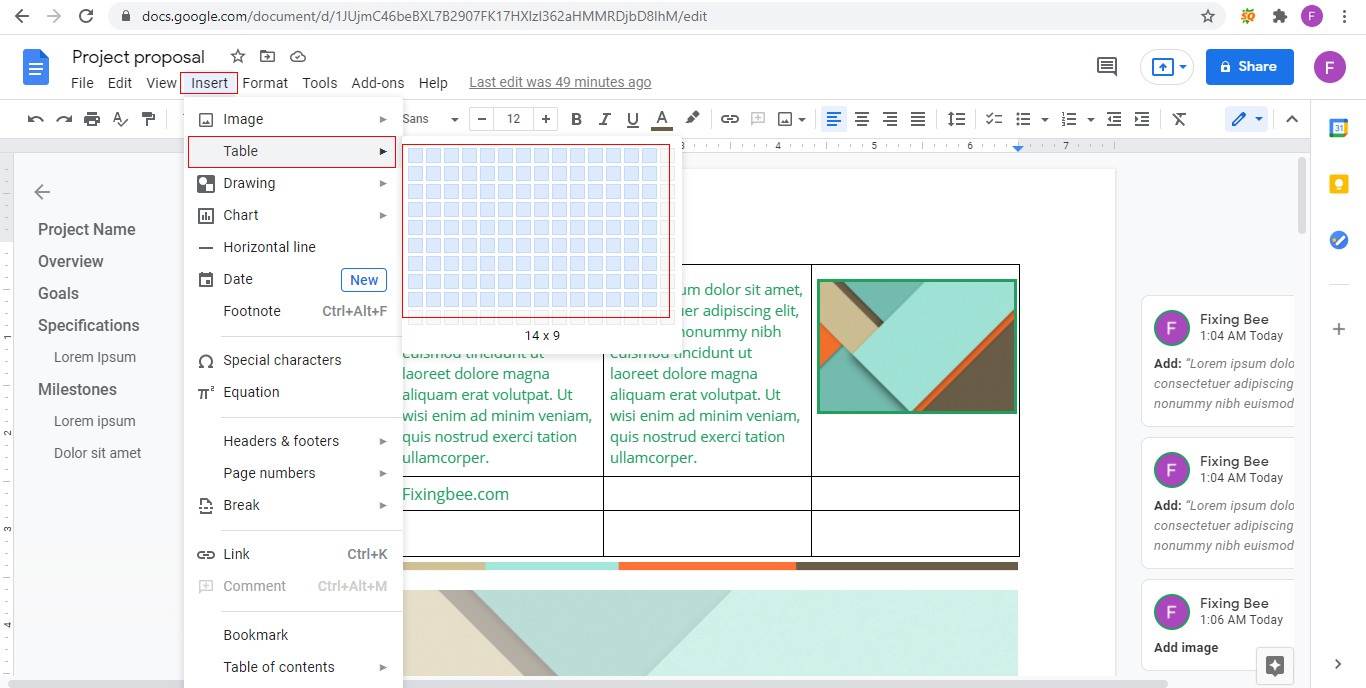
- After you come across the dropdown menu, please hover the mouse over the table, then select your rows and number of columns from the pop-out box. After selecting the correct number, click the mouse button again and see it appear as a table in your document.
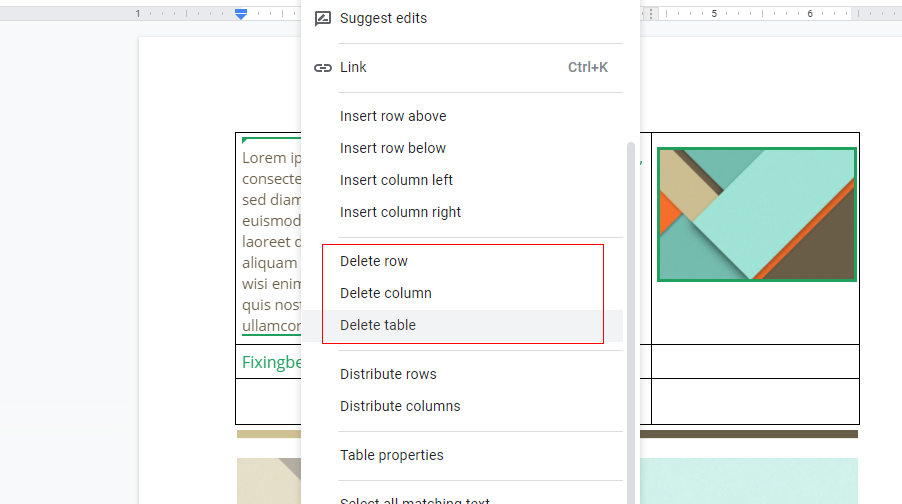
- To delete the tables, right-click anywhere on the tables and select “Delete table” from the menu that appears.
How to edit a table in the document
Inserting a table into Google Docs takes no more than a few clicks. There you can change the number of columns or rows, resize them or add a cell border.
Add Columns & Rows
You may decide that the tables are too large or too small for their purpose. Adding and removing columns and rows is easy.
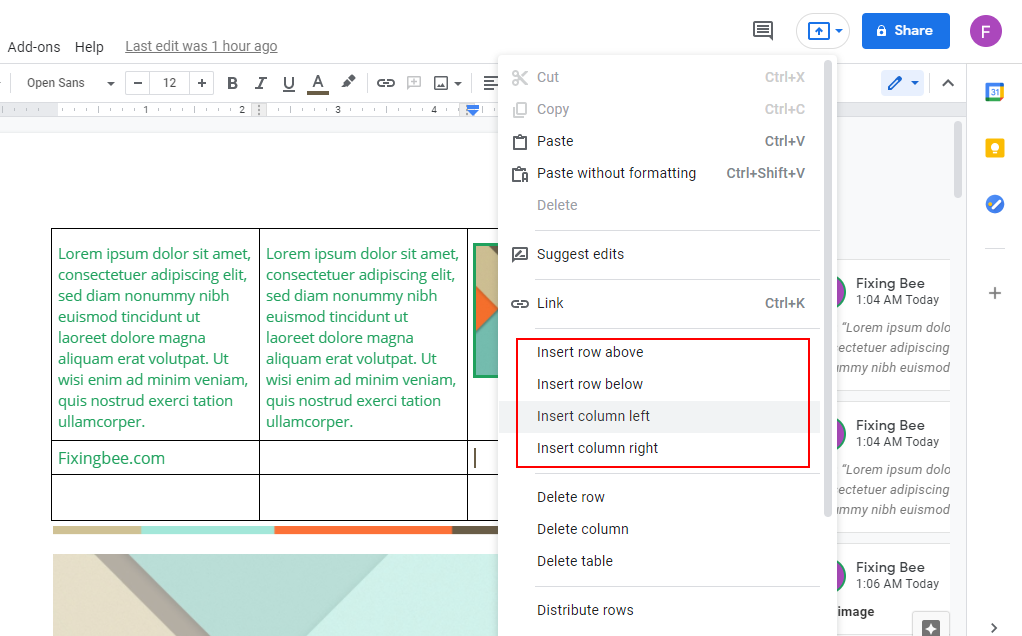
- Go to a cell in the table where you want to either add a column or row. Right-click and you’ll see the Insert options for both columns and rows in the menu.
- When you right-click, there will be a menu with options of your choice. To add rows or columns, you can choose any of the following options: “Insert left column,” “Insert a column to right,” “Insert row,” “Insert row below.” Depending on the option you choose, where you want the row or column to appear.
- The new column and rows appear in the table.
Delete Columns and Rows
You can decide whether the table is too large or too small for its purpose. Columns and rows are easy to remove.
- Go to a cell in the table where you want to move either a column or a row. Right-click and you will see the Delete options for both columns and rows in the menu.
- When you right-click on a column or row, a menu with options will appear. Select “Delete row” and “Delete column”. The column will be removed from the table.
How to Resize Columns and Rows
You will need to adjust the size of the column or row depending on the size of the items in your tables. Place your cursor on the border of a cell in the column or row that you want to adjust. Click when you see the two-way arrow display. You will see the border of that column or row highlighted in blue. Draw that line to adjust the size and release. Now the moment you notice that your mouse cursor looks like a double-arrow shown below, you need to click on your row or column and drag it to reach your desired shape.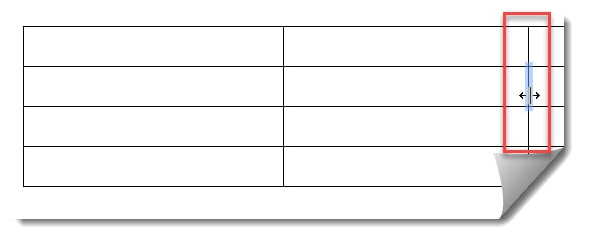
Add a Cell Border
By changing the boundaries of the tables (which we’ll show you next), you can add boundaries to specific cells. This allows you to highlight specific rooms if needed. On the toolbar at the top of the document, click on whichever style you would like to change on the tables. There are a variety of styles to choose from: the border color, the border width, the border dash, and the background color.
- Select the cell and click the small arrow in it. When the small pop-up window appears, choose the placement for the cell border.
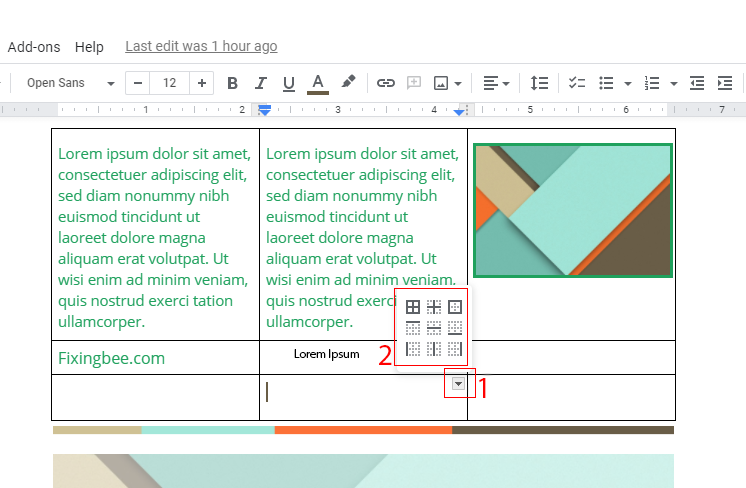
- At the same time, the toolbar will convert to allow you to customize the border. Select a color, width, or dash line for the border.
- If you want to change the boundaries of several houses at once, just select the houses and follow these same steps.
Edit a Table in the Properties
The remaining editing options for the tables in Google Docs are in the Tables Properties setting. So, right-click inside the table and select “Table Properties”.
- If you want to apply room color and alignment to the whole table, you must select it first. Otherwise, your change applies to the column or row you selected.
- Your tables border settings are at the top left of the Table Properties window. Use two drop-down lists to select border colors and widths.
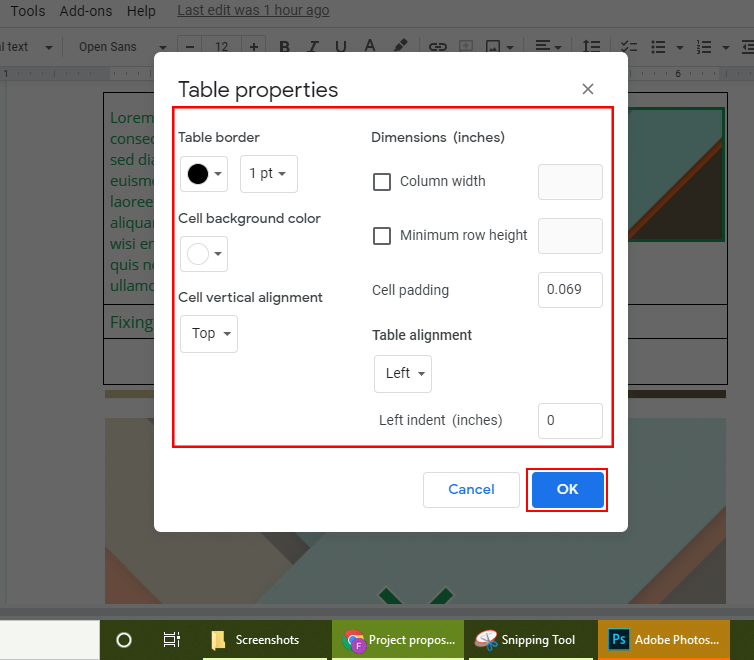
- Below the border of the tables, you can add a cell background color using that drop-down box. For cell vertical alignment, you can choose from the top, middle or bottom.
Change border and background-color
By default, the table border color is black while the cell background color is white. But we can easily make changes.
Just right-click in one of the cells, then select Table Properties from the menu. From there, you can edit both the Tables Color and the Cell Background Color to whatever you want.
How To Merge Cells In A Table On Google Docs
Merging is a useful function for combining cells to perform tasks such as adding titles to your table, creating a title for it, or collecting data from different cells into a single cell. Well, sometimes when working with tables to add a table title or heading we want to mix one in two cells and add a tile with a large font size there.
To meet these types of requirements, we can integrate the cells inside a tables
using the instructions below.
- Find the cells you want to merge. Click your mouse and then drag it to whatever you want to blend together. It highlights the cells. Make sure all the cells you want to merge are highlighted.
- Right-click your mouse and a menu with options will appear. Click on the option labeled “Merge cells” and the cells will be merged.
- In case you change your mind and want to unmerge the cells you have merged, right-click on the merged cell and then pick the option labeled “Unmerge cells.” The cells will be unmerged.
- Now, you can able to see that both the cells have been merged successfully.