Learn how to work with Application Parts when using Microsoft Access 2010 or 2013. Application Parts is a Microsoft Access template that can be added to an existing database to enhance its functionality. Even if you are new to Access, you can easily use various features to create your own database. Part of an application can be a table or include tables, forms, and relationships. When you open the Application Parts Gallery, you’ll see some built-in parts, such as blank forms, to easily create blank forms. Application parts are more complex than communication parts and include parts such as tables, curries, forms, reports, macros, and modules.
Application parts save combinations and use in standard material formation; You can save an entire application. Application Parts Inserts a database or part of an entire database application and makes it easy for users to design a database. In this tutorial, we will guide you on how to create and use the access tables template. Access tables are the basis of your database and your record entries.
How to use Application Parts in MS Access
You can create a comment table, add database objects, etc., using the Application Parts feature in Microsoft Access. Application parts that you create can be used for future reference as well. To use the application part feature, follow the steps below.
- Open or launch Microsoft Access or MS Access.
- Click the “Create” tab on the menu bar.
- From there, click on the “Application parts” button.
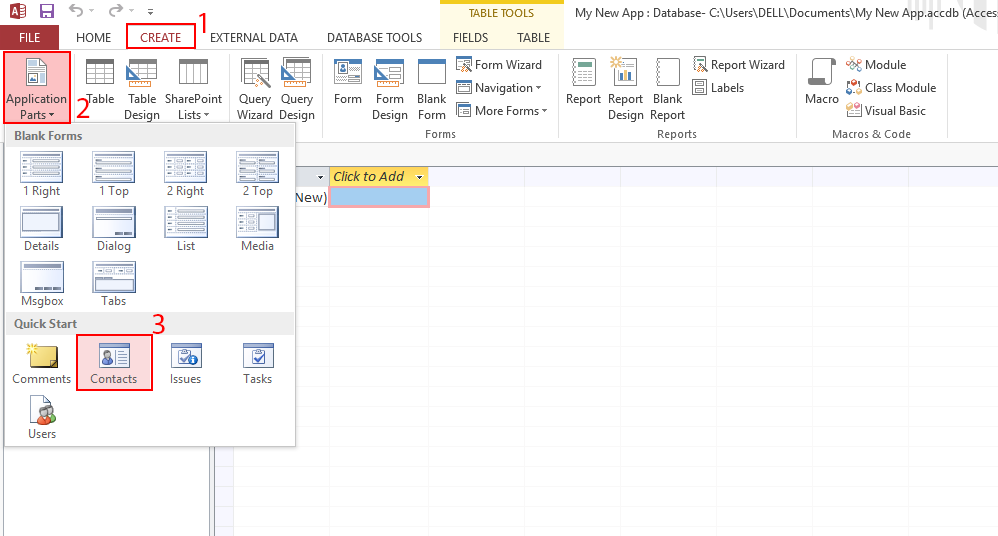
- You will see two sections of the Application parts built-ins Forms and QuickStart in the drop-down menu. The Blank Forms section includes templates such as 1 Right, 1 Top, 2 Right, 2 Top, Details Dialog, List, Media, Msgbox, and Tabs, and the Quick Start section includes Comments, Contact, Issues, Task, and Users. We will click on the Contact option. Under Quick Start, there are five application elements, some common types of table structures, and data found:
- Comments Use this app if you need a table to track your various comments. Clicking this option creates a table with the date of a comment and the comment field.
- Contacts Use this application section when you need to track personal or business contacts. Clicking this option not only creates a contact table but also creates a query, three forms, and four reports to work with the contact table. Key fields of the contact table include contact organization, job title, and phone number.
- Issues Use this application portion for recording various personal or business issues. Clicking on this option creates two forms for working with a table as well as a table.
- Tasks Use this app part to keep an eye on the various tasks and projects that are absolutely necessary. Clicking this option creates a task table as well as two forms to work with that table. Key areas of the work table include the start and end dates and percentages for the work to be completed.
- Users use this application section to maintain a list of users in your database. Key fields in the user’s table include email, full name, and login information.
- A message box will pop up if you want to close all open access to Microsoft Access; Then click Yes. Wait for the template to load.
- The contact template gives you a layout of tables, questions, forms, and reports that gives you a quick start to editing a database and saving time. You will see the layout on the left in the All Access Objects pane.
Deleting unwanted items of Microsoft Access
A list of tables, questions, forms, and reports will appear as you select the Contacts option from the buttons in the Applications section. Since these issues are predetermined, we will not use them. In this tutorial, we will focus on tables. We will start deleting the things we need. To delete all unwanted items at once, click on an item and then hold down the Shift key and click on the last item. Once selected, press the Delete key on your keyboard.
To use this table in the future, go to Backstage View by clicking on the File tab. Meanwhile, scroll down and click “Save Database” on the template and then click the “Save As” button. This way, you can use this table to access it in the future.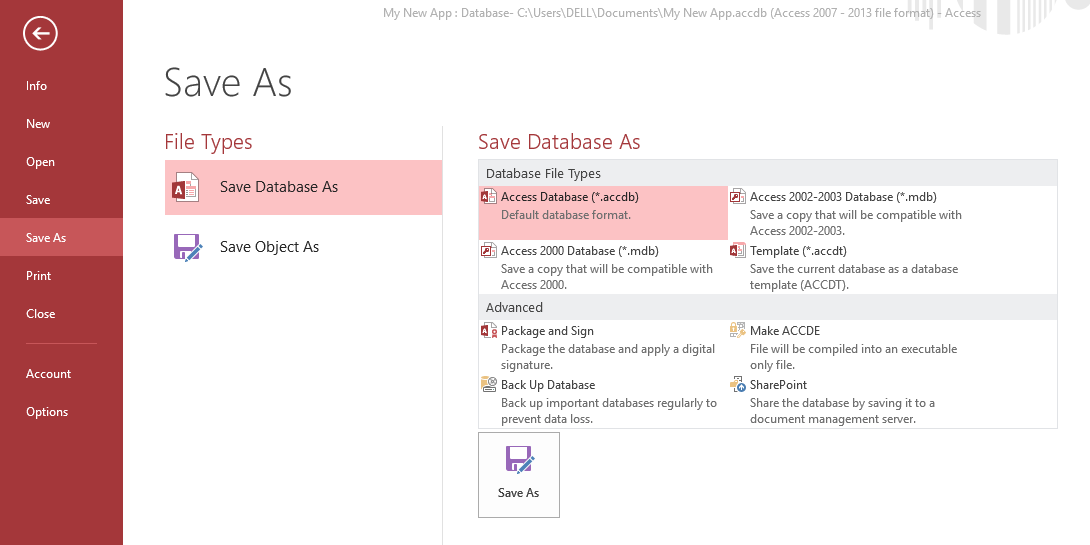
A form will appear as soon as you click the “Save Edge” button. Fill in the details and tick the “Application part” check box. When you check the box, the “Initial Table” drop-down menu becomes accessible. From the menu, select “Customer Table” and then click “OK”. A dialog box appears stating that the template has been saved.
We hope this tutorial helps you understand how to use the Application Parts feature in Microsoft Access. If you have any questions about the tutorial, please let us know in the comments.
Read More…
How to create a drop cap in Google Docs and Microsoft Word
The fundamental facts of supernova || Life and death of stars