There are many hidden under the hood of Windows 11 which significantly improves the ease of use. One of these hidden tweets involves changing the name of the network adapter. The Windows 11 Updated Settings app comes with a variety of options to make this process quick and easy. Most network adapter names are random and complex. Windows 11 lets you change the name of any WiFi network or Ethernet network adapter from within the Settings app without using the Control Panel.
Although Windows 11 lets you rename a network adapter that you can easily identify. In OS, if you need to change the name of the adapter, you need to use the control panel. But now the functionality built into the settings application has been built.
So, if you want to change the name of your wifi network adapter in Windows 11, this post will help you to do so using the settings app. In this guide you can learn the naming steps of a network adapter through the Settings app in Windows 11.
Windows assigns a common name to each network connection. For example, you may have a Wi-Fi or Ethernet connection. If you prefer something more personal, you can change the name of your network connection in Windows 7, 8 and 10.
How to Rename WiFi network adapter on Windows 11
To name a Wi-Fi network adapter on your Windows 11 PC, use the following tips:
- To rename the WiFi network adapter on your computer, open the Settings app first. For this, right click on the Start menu and select the Settings option from the menu list.
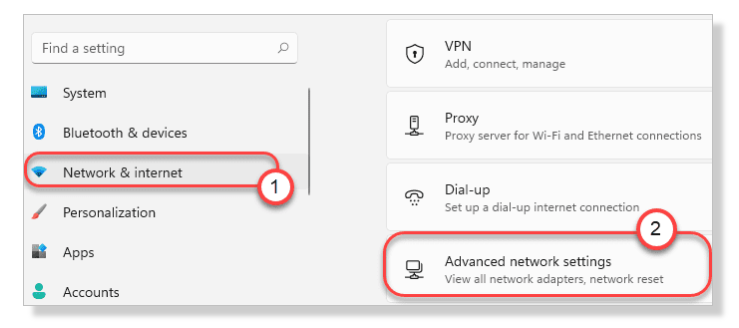
- Then click on the Network & internet tab.
- Now, on the right side of Settings you will different connectivity settings. Tap on the “Advanced network settings” to access it.

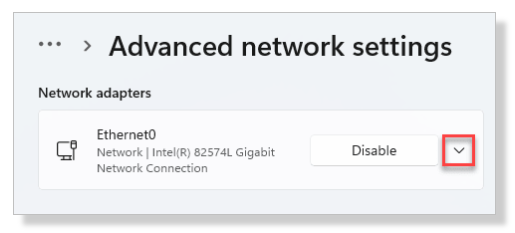
- You will see the list of network adapters on the right side. Just expand the network adapter.

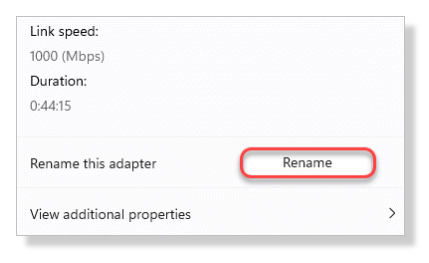
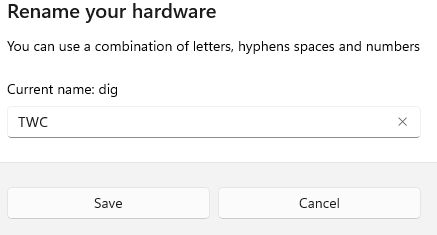
- Go to the Rename this adapter option and then click on Rename button. In the next popup menu, you will see the current name of your adapter. To rename your hardware adapter, you can use a to z, hyphen spaces, and numbers from 0 to 9 in the case of names.

- Once you have created the preferred name, you can click the save button to apply the changes here. This way you can easily name the WiFi network adapter on your Windows 11 computer system.

Just scroll up on the same page of the Settings window, and you will see the name of the network adapter. That’s all about the network adapter renaming on Windows 11.