Windows 10 includes Windows Defender, built-in antivirus software that is the first line of defense against malware infections. You may think that you need to know how to turn off Windows Defender. If you have an antivirus application running, Windows Defender will be disabled automatically. Because your antivirus software will take security from now on. It scans your PC for real-time malicious software and disables it automatically after installing antivirus software on your system.
However, if you find that Windows Defender prevents you from running/installing programs or downloading files, you can remove it manually. In this article, we will show you how to turn off Windows Defender. This FixingBee teaches you how to turn off Microsoft Defender (formerly Windows Defender), in Windows 10. Keep in mind that disabling Microsoft Defender will open up your computer to security threats.
Now officially known as Microsoft Defender Antivirus, it is better known by its previous name. It is one of the best antivirus programs available and comes completely free with Windows 10. This is a huge help for anyone who wants reliable protection against malware without the hassle of downloading additional software. In most cases, you should keep it active to keep your system secure.
However, sometimes, you may need to disable Windows Defender. Here’s how to turn off Windows Defender in Windows 10 to see if it interferes with any of your applications or if you need to test anything other than that.
What is Windows Defender?
Windows Defender (now known as Microsoft Defender Antivirus) is a perpetual, anti-malware software that protects your computer from external threats. It was an anti-spyware program built to fight unauthorized access and protect Windows computers from unwanted software.
Introduced with the Windows Vista installation pack, it is now available for free download as part of Microsoft Security Essentials. Microsoft has developed an antivirus to protect your computer from viruses running the Windows 10 operating system. If you’ve upgraded to Windows 10 laptop, you might notice the inclusion of the Microsoft Defender Antivirus program.
Features of Microsoft Defender include automatic backup of files on OneDrive, eliminating the need for parental control settings and passwords, which have been replaced by facial recognition and fingerprint technology. See here what the program is, how it is enabled on your computer, and how to change its settings.
Why disable Microsoft Defender?
Good question you ask! If Microsoft Windows Defender is a free antivirus that protects your system from malware attacks, then why would anyone feel the need to disable it or turn it off? Despite its essential role in Windows security, there are good reasons to disable Windows Defender.
If you plan to install another virus application, you should disable Microsoft Defender. If you don’t, expect problems. Win 10 may fail to install the update. Windows Defender may consider small developer programs or applications as a threat and will not allow you to install them.
The Microsoft Defender and your new virus program may identify each other as malicious. Sometimes you want to make sure the software is safe and valid and install it, but Microsoft Defender puts it away. In this case, you may want to temporarily disable Windows Defender. You don’t want that If you do not plan to connect your Windows 10 PC to the Internet, it is understandable to disable Windows Defender.
There is a built-in kiosk mode for Windows 10. If you ever change your mind, make sure you restart Defender. There are numerous third-party antivirus programs on the market that can be used in place of Microsoft Defender. One advantage of installing a third-party antivirus is that it gives you more security and control over it. You can disable it at any time and reactivate it. Here are some reasons to disable Microsoft Defender Antivirus.
Turn off Windows Defender through settings
This is the fastest and easiest way to disable Windows Defender. All operations will be done through settings. Just follow these steps:
- Open Start by clicking on the Windows logo on the bottom left of your screen.
- On the Start menu, locate and click on Open Settings by clicking on the gear-shaped icon on the left panel.
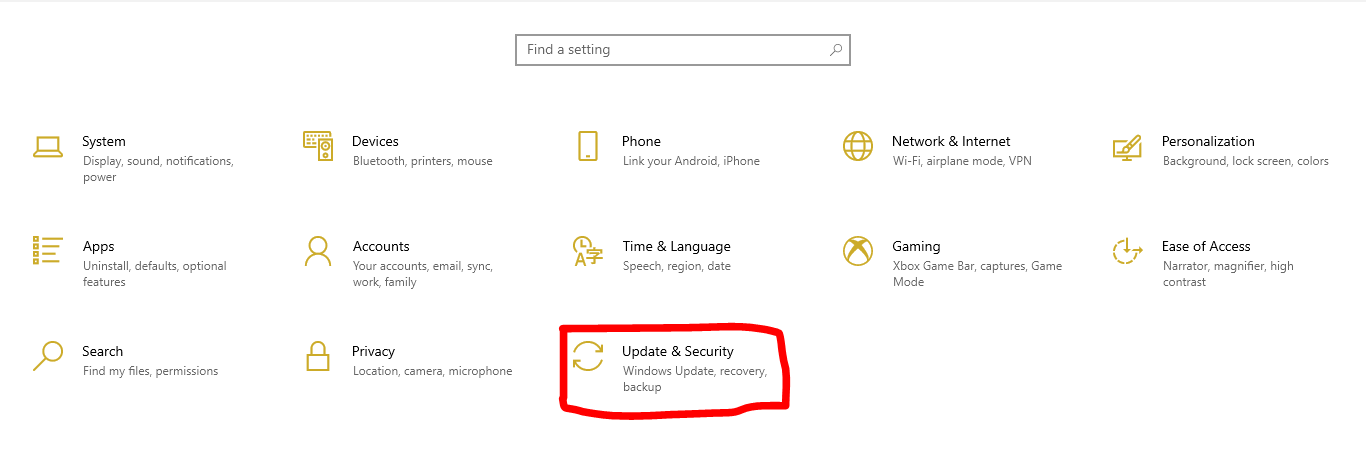
- Windows Settings will open up. Proceed by clicking on Update & Security. It will be the last option.
- Next, go to Windows Security by clicking on the left side panel.
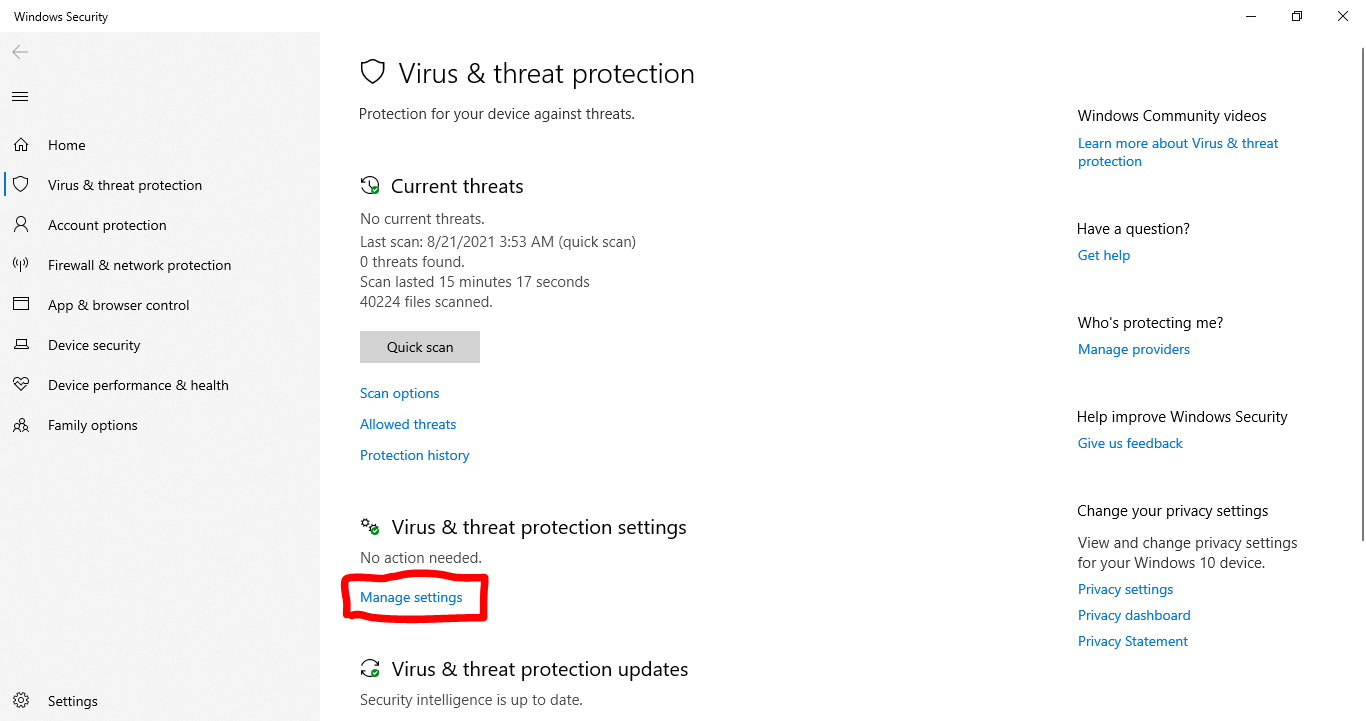
- Under the Security area, click Virus and Threat Protection.
- The Virus and Threat Protection window will open. Under Virus and Threat Protection settings, proceed to manage settings.
- Real-time protection will be the first option in front of you. Under Real-Time Protection, click the blue ON switch.
- If you want to make changes, Windows will prompt you. Click Yes. You will see the message that real-time protection is turned off, an indication that you have successfully turned off Windows Defender.
At any time you can follow steps 1 through 7 and click the close button again to re-enable real-time protection.
The advantage of turning off real-time protection through virus threat protection settings is convenience and speed. You can quickly turn it off and then turn it on again. One thing to keep in mind is that when you restart your computer, Microsoft Defender will start automatically.
How to Disable Windows Defender Using Group Policy
Group Policy lets you disable Win Defender. Only Windows 10 Pro, Windows 10 Enterprise, and Windows 10 Education have this feature. If you have never used a group policy before, you must avoid this method.
Click on the search box in the bottom-left corner of your screen.
Type Run into the search box. Click on Run in the pop-up menu. Or press Windows key + R.
Enter gpedit.msc into Run and tap the enter key on your keyboard.
Under “Computer Configuration”, double click “Administrative Templates”. Click on Windows Components.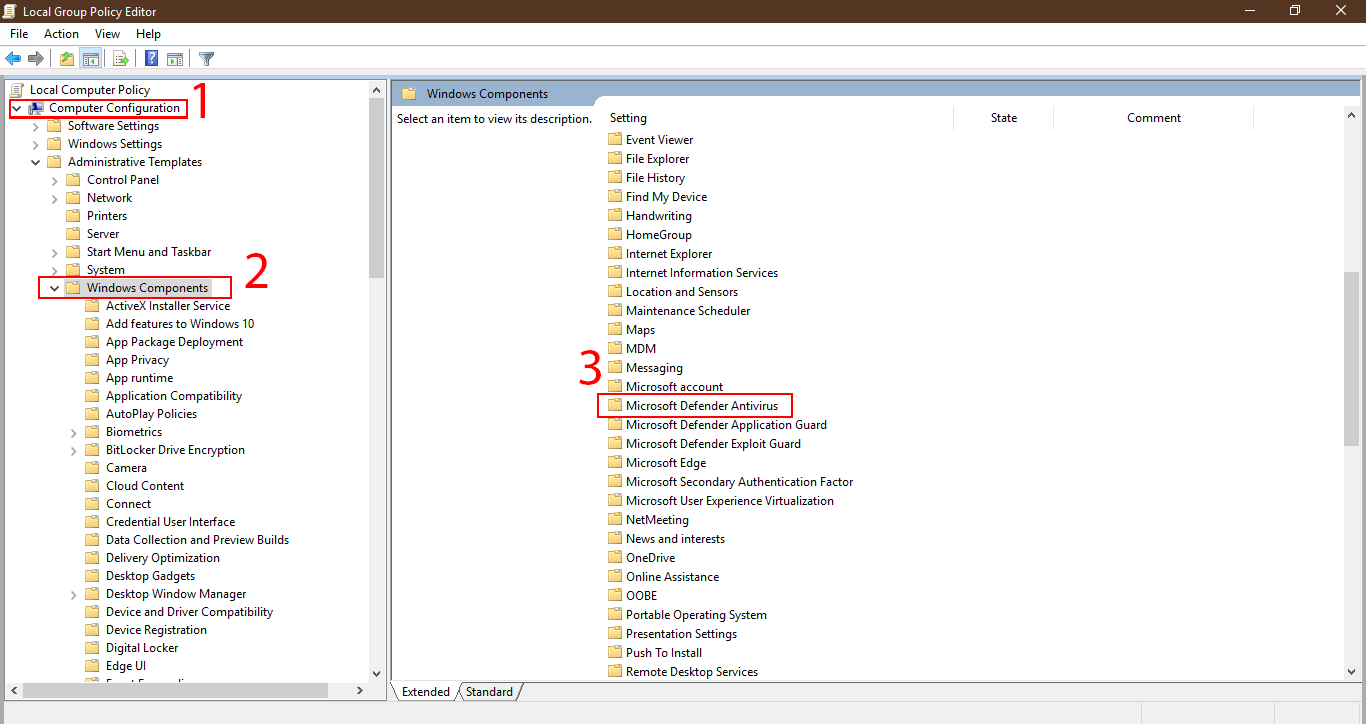
Scroll down the list until you see Windows Defender Antivirus or Microsoft Defender Antivirus and double-click on it. Now double-click Turn off Windows Defender Antivirus.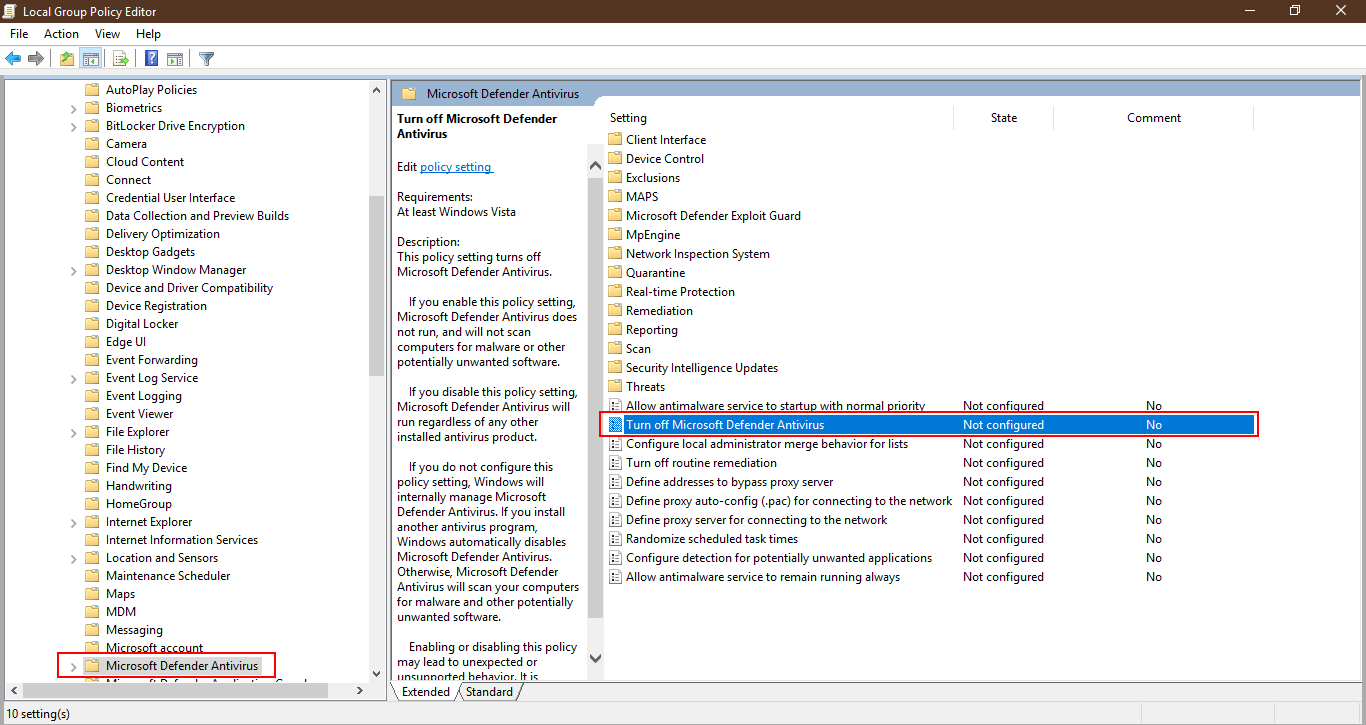
A new window opens. Highlight the Enabled option on the left and click on Apply and then Ok. Finally, restart your computer for the changes to take effect.
You have now used Group Policy to disable Microsoft Defender. A notification will appear in the system tray informing you that you have no virus protection enabled. This button will disappear after you restart your PC. This is a permanent solution for Defender Antivirus.
If you need to enable Windows Defender again, follow the steps, highlight “Not Configured,”, apply, and then click OK. Restart your computer, and Windows Defender will be activated again.
How to disable Microsoft Defender through the registry
Each Windows 10 PC has a registry that you can use to change settings and disable Microsoft Defender. Follow these steps to permanently disable Microsoft Defender through the registry.
Open Start by clicking on the Windows logo at the bottom left of your screen.
Type “Regedit” in the search bar, and proceed by clicking on the Registry Editor with the blue icon.
Click Yes when prompted by Windows.
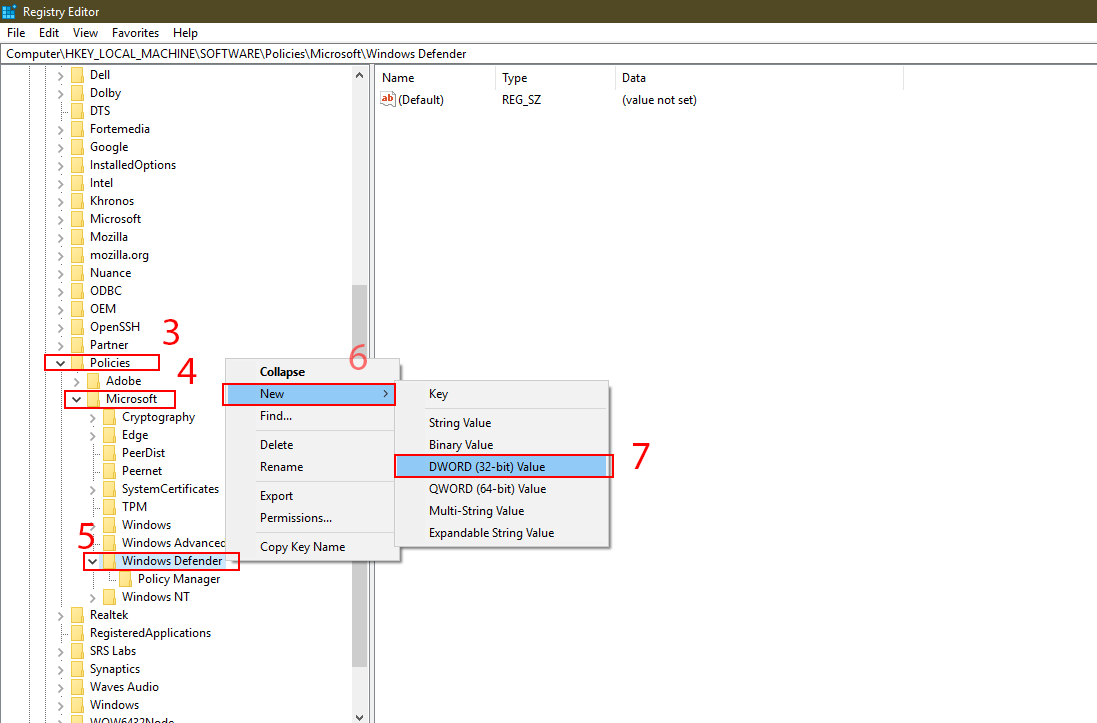
The Registry Editor will open. On the left, you will see several options. You need to find the Microsoft Defenders location, extending the following:
- First, double-click the “HKEY_LOCAL_MACHINE” folder to expand.
- Next, expand the “Software” folder.
- Scroll down and find the “Policy” folder and expand it.

- Expand the “Microsoft” folder.
- Then, click once in the “Windows Defender” folder.
If you want to enable Microsoft Defender again at any time, follow these steps:
- Open the Registry Editor.
- Search in “Windows Defender“.
- Double click on “DisableAntiSpyware”.
- Edit “Value Data” as 0, and click OK.
- Restart your system for the changes to take effect.
This procedure is a bit complicated and lengthy, but it will permanently disable Windows Defender. Restarting your computer will no longer enable Defender. With this method, you can install any app and change any setting without fear of Microsoft Defender. Windows 10 will compromise the security of your computer.